Showing posts with label veganosaurus. Show all posts

Wednesday, September 21, 2011

Vegan Etsy Gears Up for Vegan Mofo


It's that time of year again friends! October kicks off the 5th annual Vegan Month of Food or Vegan Mofo for short. Head on over to the Vegan Mofo headquarters and sign up your blog before September 28th. The goal is to blog at least every weekday about your vegan food adventures. Lots of people come up with fun themes to follow for the month but you don't have to. Take the challenge! The Vegan Etsy Team blog will be participating, as will individual members on their blogs. Participating team members include:

My Zoetrope
Veganosaurus
Veganville
Panda With Cookie
Vegans on the Move
Kittee: Craft Maker to the Stars
Miss Muffcake
Veggie Amanda (Newman Improved)
The Traveling Austin Vegan

Follow their blogs this month and see what the Vegan Etsy Team comes up with for Vegan Mofo!
And don't forget to follow the main MoFo blog for lots of giveaways including some by VET members Panda With Cookie and Sweet V Confections!

Friday, May 13, 2011

Giant Cookies, Tiny Monsters, Delicious Dinners... OH MY!!!

In case you don't know it, there are delicious / gorgeous / adorable things happening over at the blog of our very own Veganosaurus. Do yourself a favor and discover her world of tiny monsters, and then cruise on over to Cute Little Package to get some inspiration for dinner!

Monday, November 29, 2010

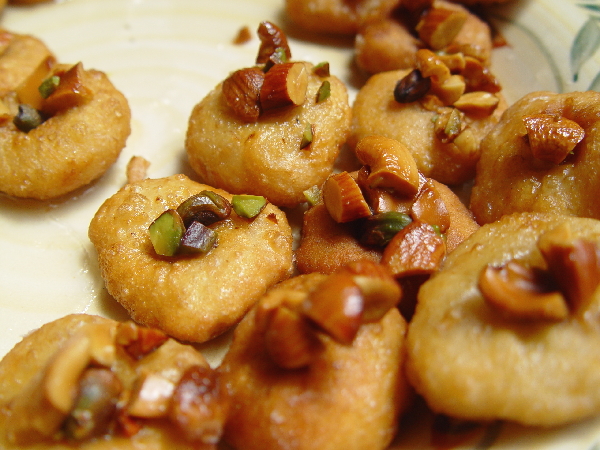
Vegan Baadusha Recipe

Baadusha is a deep fried South India dessert which is made on special occasions like festivals. We've been making these babies for Diwali in the recent years. One of the quickest desserts to make! The only 'work' involved is the deep frying and even that can be easy with a partner.

Baadusha

2 C maida/all purpose flour (I do intend to try these out with whole wheat flour at some point though)
1/2 C cold coconut oil + more for deep frying
2 C sugar
2 C water + more for the dough
A generous pinch of baking soda
Tiny pinch of salt
Chopped nuts - pista, almond, cashew

Fry the chopped nuts in a bit of coconut oil until lightly brown, strain and keep aside.

Pour this strained oil plus the remainder of the 1/2 C oil into the flour along with the salt and rub everything together until crumbs form.

Sprinkle the soda on top, add a little bit of water and knead into a soft dough.

Cover with a moist cloth and keep aside for about 15 minutes.

Meanwhile, prepare a slightly thick sugar syrup with the sugar and water by boiling them together.

While the syrup is still warm, heat the oil for deep frying.

Shape the dough into little balls, flatten them and press your thumb (or index or whichever finger you like) down in the middle to form a crater in each one.

In batches, deep fry them in the hot oil on a medium flame until golden brown and transfer them directly into the warm sugar syrup.

Let them soak for about 10 minutes.

Using a slotted spoon, transfer them onto a plate and place the nuts in the craters.

After they cool slightly, the sugar syrup will harden a bit and form a layer on top.

At this point the Baadushas are ready to munch on. :)

Friday, September 10, 2010

Vegan Polenta Pizza

Well it isn't exactly like regular pizza but it is sooo yum and super easy to make too. I only have access to a microwave right now so I baked this pizza in it but once I get back home I'm definitely going to try this out in a real oven.

Polenta Pizza close upCrust:
1 C polenta corn grits
Olive Oil
Salt
2 C water

Bring the water to boil. Add salt and a dash of olive oil. Slowly add the corn grits while stirring continuously with a fork. Reduce the heat and keep stirring until all the water is absorbed. Close the pan and let it sit.

Topping (you can use any combination of veggies of course but here's mine):
Tomatoes sliced into circles
Onions sliced thin and long
Rice Vegan Cheese Slices cut into little pieces

Marinade:
Tamari
Ground Black Pepper
Sugar or Agave (teeny bit)
Tabasco Chilli Sauce

Mix the marinade ingredients together in a bowl. Place the chopped onions in the marinade and toss well. Let it sit for 15-20 minutes.

Oil your pizza tray (I directly used my glass microwave turn table) and transfer the polenta onto it. Dip your palm in a generous amount of olive oil and pat the polenta down into an even base. Bake on high power for 5 minutes.

Take the onion slices out of the marinade and spread them evenly over the base. Place the sliced tomatoes over this and top with the rice vegan cheese pieces.

Bake on medium power for 5 minutes and then on high for 2 more minutes.

Slice and serve hot. Enjoy! :)

Polenta Pizza

Wednesday, May 12, 2010

Caramelized Bananas

A dessert that's not only vegan and diabetic friendly, but also ridiculously simple to make - Caramelized Bananas. These bananas are scrumptious!

Caramelized Bananas

Sesame seeds - toasted well in a dry pan.
Ripe Bananas - cut in half lengthwise and horizontally.

Heat a pan (non-stick/Teflon makes things a lot easier). Place the bananas in a single layer in the pan. Gently flip the bananas once in a while as they cook. Once they reach a delicious looking golden color take them off the flame.

Serve sprinkled with the toasted sesame seeds.

I bet it takes you lesser time to make this dish than in took me to type it out for you. Enjoy! :)

P.S: I learnt (yep, that's the proper British spelling) this recipe at an awesome seminar by Dr. Neal Barnard and Dr. Nandita Shah (of SHARAN India).

Wednesday, February 24, 2010

Make it with love and it will sell!

Original Post on the Rants and Raves of a New Age Chick blog.

Victoriana Red Rose Cameo Necklace by StarrlightJewelryAs an independent artist who's been selling online for a few years now I have learned many selling tips from other online sellers who generously took the time and effort to share their knowledge - from taking top-notch photographs to dealing professionally with customers.

But I've also learned many lessons by personal experiences. Among these, the most important one is to never let a slump in sales bring me down. I understood the hard way that the more I obsessed about not having a sale, the longer it took for one to occur!

It happens to all of us. The problem is, not only do we let the lack of sales bring us down but we also make some really wrong moves which could be avoided if we took a few breaths and looked at the situation for what it really is... a fall which will be followed by a rise. It's always a cycle!

A couple of things to keep in mind always:

VALUE YOUR ART AT WHAT IT'S WORTH


This little Piggy is NOT going to market................ midnightrabbitsDuring one of my slumps, I was approached by a store to sell them my miniature animal sculptures for less than half their value just so they could mark up their selling price at a 100% and make huge profits. They said that the discount I was offering them wasn't enough. I had a hard time making a decision. By grossly underpricing my work I could make a small chunk of money right then. I had no guarantee that my stuff would sell in the future at what I was asking for anyways. But just the thought that I would be selling off my 'babies' to these greedy people who didn't even appreciate the time and love I put into them (no matter how much they oohed and aahd over the animals) really bugged me. So I didn't go through with the deal. Today I'm selling the same little critters for what they're truly worth and I feel happy knowing that only someone who completely appreciates the value of my art will pay the price for it and therefore my 'babies' will have a loving home :)

A small discount to promote sales could be useful on occasion but freaking out and marking down your prices way below what you deserve is really not the best way to go. Waiting a few weeks or even months and earning 60 dollars for that beautiful painting you put hours of work into is far better than getting 25 dollars for it right now! (Unless you're in dire need of cash which is another issue altogether). By selling yourself short you not only disrespect the art but also reduce the value of your creations in the eyes of any future buyers.

CREATE ONLY WHAT MAKES YOU HAPPY

I create when I feel the need to create. When I'm overcome by the urge to sculpt and mold and twist and hammer. And then, I make whatever floats into my mind and flows out of my fingers. My designs are rarely pre planned. A large part of why I don't, nor can I, make two things which are exactly the same. It is extremely difficult for me to create something on order. And on the rare occasion that I do take on custom pieces, I always make it clear that if the creation has to be of my usual top-notch quality, it might take me a lot of time to make it and it might not be exactly what is being asked for because I neither force myself to make something I'm not comfortable with, nor make myself create when I don't feel like it. It is very very important to me to pour my heart and soul into what I'm making so the final creation vibrates with the love.

Organic Cotton Knit Hat Chocolate HolisticallyHeatherIt's good to keep an eye on the market trends and know what styles are popular and maybe even incorporate that into your designs. But changing your style entirely just to get out of the slump would really hurt you in the long run. Particularly if it's something you don't even enjoy making. Heck, if you have to earn a living doing what you were not happy doing then you might as well take on any regular job instead of creating art. It is very important to remember that just because the jewelry you're making is not in a popular style right now, doesn't mean no one likes it. When you make that necklace with a smile on your face that smile seeps right into your creation and well, it's hard to resist buying a necklace that's smiling at you and making you smile :)

MAKE EACH PIECE AS IF YOU'RE CREATING FOR YOURSELF OR SOMEONE YOU LOVE

My most popular pieces have been the hardest to let go of simply because I wanted to either keep them for myself or gift them to my mom, my sis or a really really close friend! :) When I make something with myself (or the people I love) in mind then I automatically pour even more love into it than I normally do. I pay extra keen attention to every little detail and I completely enjoy the creating process because of the anticipation and excitement of the reward.

Happy Squirrels VegancraftasticRemember why you started to create in the first place? If you're anything like me then your art never started with an intention to sell. You created because it made you feel good. And you made things for yourself or as gifts for friends and family. You didn't treat your creation as just another product that was fun to make. When it's for you, or someone you love, it's more precious than that! So the next time you work on that lovely art doll, constantly picture her sitting on your coffee table. Visualize the glow on your friends face as she writes in that handmade paper book you're making.

When you create this way you have nothing to lose. Even if by a rare chance what you've created doesn't sell for a while then you are still happy because you get to keep it or gift it to someone you love.

And finally...

LEARN TO LET GO

Owl Magnets Shae7d7I've seen this time and time again! When I obsess about the slumps for days together it's as if I'm creating a block for any sales to happen. I'm just focusing on what's not happening and getting frustrated. The day my mind is pre occupied with something else and I haven't even thought of my shop all day long... WHAM! That's the day I get the sale(s)!!

Trust in yourself and in your art. Make something, list it and forget about it. The less you're thinking about sales, the more sales you get. And as you keep practicing this letting go, you'll ultimately reach a point where the slumps become rare and are gone before you even notice. Nirvana! :oP

Tribal Dance Necklace artbysusmithaKnow this...

When you make something with love it will sell! It might happen today or next week or two years down the line. No matter when, a sale is certain. No two ways about it!


Featured Items by: StarrlightJewelry, MidnightRabbits, HolisticallyHeather, Vegancraftastic, Shae7d7, Artbysusmitha.

Tuesday, January 19, 2010

Vegan White Chocolate Orange Almond Truffles


So this is where too much Vegan Blog hopping gets me!

A while ago, I came across these super yum looking White Chocolate Walnut Truffles on the VegSpinz blog and I was immediately overcome by the desire to stuff my face with them!

So I decided to create a variation of my own...

White Chocolate Orange Almond Truffles


All ingredients are in approximate values since I just throw stuff in without measuring. Feel free to modify the amounts to your liking.


1 C Vegan White Chocolate Chips
1/2 C Cashews
1/4 C Soymilk (use as required)
1/4 t Orange Essential Oil
1/4 C Almonds
1 C Vegan Dark Chocolate Chips

For the truffle mixture:

-Grind the cashews into a fine powder, add a dash of the soymilk and blend, add a little bit more soymilk if required and process into a very creamy paste.
-Melt the white chocolate chips (in a double boiler or in the microwave).
-Toast the almonds and crush them lightly into tiny pieces. If you have the patience you can chop them :oP
-Mix the cashew cream and orange essential oil with the white chocolate.
-Add in the almonds and mix well.
-Pop in the freezer for around 20 minutes or so, until it has hardened slightly.

How to proceed:

-Melt the dark chocolate chips.
-Make little balls of the truffle mixture and dip them in the melted chocolate.
-Drop them on parchment paper.
-Pop in the freezer to set again.


Note: I have used truffle molds for these. These can be used by coating the walls and bottom of the mold with the melted dark chocolate. Putting a bit of the truffle mixture in and covering the top with a layer of melted dark chocolate.

Enjoy! :)

Friday, December 5, 2008

Recipe- Penne in Mint Cilantro Pesto Sauce

The following recipe was submitted by Susmitha of Art by Susmitha and Veganosaurus.

Cook 1 Cup of dry Penne in salted boiling water according to the instructions on the pack.

To be blended into a paste/sauce without using any extra water (the liquid from the tomatoes will be enough).

1 C spearmint
1 C cilantro
2 Green chillies
Handful of Almonds
1 T nutritional yeast
1 T flax seed
2 T Extra Virgin Olive Oil
4-5 Ripe Tomatoes
Sea Salt to taste

How to proceed:

Cut 1 large capsicum (green pepper) into cubes. Put in a microwave safe glass dish, cover and cook on high for 3 minutes. Mix in the blended sauce, cover and cook on high for 3 more minutes. Let it sit for a few minutes.

For the microwave haters, this can also be made easily on stovetop. Just stir fry the green pepper in a dash of olive oil very briefly (about a minute), add the pesto sauce and bring it to a boil and immediately switch off the flame.

Mix in the cooked Penne.

Enjoy! :)